How To Make Good Labels For Inventory Locations
A Location Without a Label Is Nothing.
We’re serious when we say that every location in your facility should have a name and a label. (There are some common-sense exceptions, for instance, public areas where labels can’t be displayed or areas that only contain a few large assets that are easily counted.) It may seem extreme, but the cost of labeling a location and having it available in the Clearly Inventory application are so small, and the alternatives—having to go back and label locations again, “losing” items because they aren’t stored in a known location, having jumbled location names—are so great that it just makes sense to take a little extra time and thought to use location labels to get the job done once.
How to Label Your Locations
Tips on Making and Mounting Location Labels
- Your labels should be durable and fixed in place (i.e., don’t use magnets or labels that can be easily moved).
- Labels should be easy to read, preferably from across a room.
- Consider using easy-to-spot colors such as black on yellow or white on red. (If you decide that easy-to-spot colors are too “ugly” or you can’t easily make new labels with the same color scheme, you may not want to do this.)
- It should be easy to change or create labels (use an office printer or label maker to make them).
- They should be mounted so as not to obstruct normal activity or get easily ripped off or damaged.
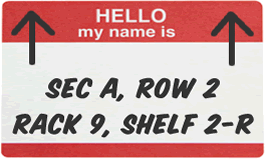
- They should show the FULL NAME of the location, and no two labels should be the same.
- They should have arrows that point to the location, making identifying the correct location easier, especially with shelf labels.
What You’ll Need to Make and Mount Location Labels
Labeling Supplies – The Minimum (Lowest Cost)
- Precut paper strips
- Sharpie or permanent marker
- Wide heavy-duty clear tape
- Scissors
- Duct tape or masking tape
- Pencil
- Notebook paper

You may be tempted to count your inventory as you create and mount your labels. Don’t do this! It will make BOTH processes more time consuming than if you do them separately. Get everything labeled, then start your counts
You can get the job done with the above list of items, or you can skip the paper, Sharpie, and clear tape and invest in tools that are a little more expensive.
Labeling Supplies (More Expensive)
- Portable label maker or desktop label printer: Labels made with a label maker have a cleaner and more consistent appearance. They also have self-adhesive backing.
- Small hand roller (available at hobby shops): The small hand roller will help in applying labels firmly to flat surfaces, as well as odd surfaces like wire racks, without wearing your fingers out. It also helps apply pressure to, and eliminate air bubbles from, the labels without moving them or messing them up.
- Bonus: A mobile work top will make things easier. A mobile work surface will help keep your supplies together and give you a place to write on. You can also keep your coffee with you as you move about your facility.
- If you need to make a lot of labels and don’t want to hand write them or use a label maker, consider building a list of location names in Excel and then doing a “mail merge” in Word. Then you can cut and tape your labels or print them on self-adhesive labels.
How to Make Good Location Labels and Apply Them Properly
First, position yourself in the first area/room/zone that you want to start labeling, and stand in front of where you want to start your sections. Then write or create your label. Remember, you want to include the FULL LOCATION name on the label. (If you’re using the paper strips, pen, and tape, write the location name on the paper strip, make your arrows, and then cover it up with the clear tape.)
Tips on Applying Labels:
- Before you apply your label, make sure that the surface is clean. If you have any doubts about whether or not the label will stick over the long-term, cover the label with clear packing tape.
- If you are trying to apply a label to a wire rack, use the duct tape on one side of the wire so that the sticky side of the label and the sticky side of the duct tape will stick together with the wires in between.
- If your label maker can’t print arrows, or it’s too difficult, print a sheet of arrows using a word processor and then cut and tape the arrows on either side of your labels.
- If you’re applying a lot of labels, use the roller we describe under “Labeling Supplies” above. It’s great for firmly pressing labels and getting rid of air bubbles. If you do this with your fingers, they will get sore, and chances are that you’ll go through more than a few labels when you try to smooth them out and deform them by mistake.
Your labels should start with the zone abbreviation (if you use zones), the section letter (if you use sections), and then descend from 1 – 10 or A-Z from the highest point to the floor. If you have two locations side by side on a shelf, consider ending one with “L” and the other with “R” (for “left” and “right”).
Again using the illustration of our Sweet Little Devils store, let’s review our labeling practices:
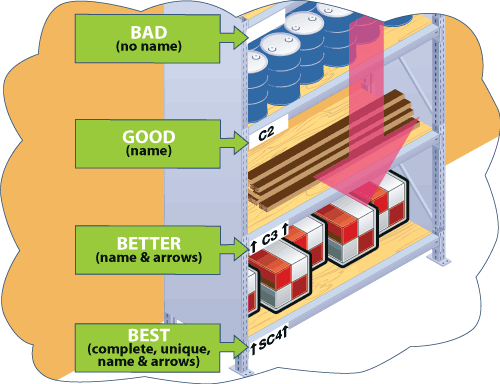
Let’s take a closer look at our “BEST” example from the left illustration. We have:
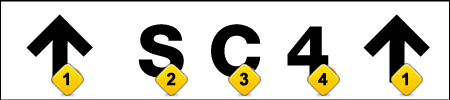

Arrow points up, removing any doubt about which location the label is referring to

Zone abbreviation “S” for the storage zone

Section “C”

“Vertical” or “shelf” location number
Labeling Locations That Move
If you have racks on wheels, carts, or other items in your facility that move, consider naming them with the descriptive term for the item, followed by a serial number or letter. For instance, if you have mobile cooling racks for baked goods, you might call them “RACK A”, “RACK B”, etc. Since these can move, using the “zone” or “section” naming conventions doesn’t make sense for movable storage spaces.

“The best labels leave NO doubt about the name or physical location to which they refer.”
– Albert Einstein* [*Just kidding]
Make a List of the Locations as You Go
Write down the location name of the label you just applied on the notebook paper using the pencil we told you to keep with you. You’re building a list of your locations that will ultimately get transferred to a spreadsheet and then uploaded into Clearly Inventory. If you have a laptop, you can enter the location names directly into Excel as you go, but you may find it easier to just write them down and enter them all at once.
Repeat the above process until every location is labeled and you have a written list of all of your locations.
Once you’ve completed your labeling and have a written list of all of your locations, you’ll need to get the location list into a spreadsheet program like Microsoft Excel or Google Sheets. Save the sheet. You’ll upload it into Clearly Inventory a little later. But before we do that, we need to get our descriptions and units of measure ironed out.